Docker's multistage build feature is a powerful tool for creating lean and secure images by separating the build environment from the runtime environment.
This approach is particularly useful when building custom Service Provider Interfaces (SPIs) for Keycloak, a popular open-source Identity and Access Management solution.
In this blog post, we'll explore how to use Docker multistage builds to compile custom SPIs with Maven, incorporate them into a Keycloak image, and add a custom theme to enhance the user interface.
Setting the Stage
In our project, we utilize an example SPI implementation inspired by the Keycloak guide available at Keycloak User Storage SPI Quickstart. This guide provides a solid foundation for understanding how to extend Keycloak's functionality through custom SPIs.
Additionally, we have designed a custom theme for Keycloak based on the instructions found in the Keycloak Server Development Guide. This allows us to tailor the look and feel of Keycloak to better fit our project's branding and user experience requirements.
One of the key advantages of using Docker's multistage build process in our project is the ability to compile and package our custom SPIs and integrate a custom theme directly into the Keycloak image. This method ensures that our final Keycloak deployment is both optimized for performance and customized to meet our specific needs.
The Dockerfile Breakdown
Our Dockerfile consists of several stages, each serving a distinct purpose in the build process:
Set global variables
Dockerfile
ARG KC_VERSION=24.0.1
Stage 1: Maven Build
Dockerfile
FROM maven:3.9.6-eclipse-temurin-21-alpine AS mavenbuilder
COPY spi /usr/src/app/spi
RUN mvn -f /usr/src/app/pom.xml clean package
This stage uses a Maven image to compile the Java applications. We add our custom SPI implementation files to the image and run Maven to build the SPI JARs.
Stage 2: Keycloak Builder
Dockerfile
FROM quay.io/keycloak/keycloak:${KC_VERSION} AS builder
COPY --from=mavenbuilder /usr/src/app/spi/target/*.jar /opt/keycloak/providers
COPY themes/custom /opt/keycloak/themes/custom
ENV KC_HEALTH_ENABLED=true \
KC_METRICS_ENABLED=true \
KC_PROXY=edge
WORKDIR /opt/keycloak
RUN /opt/keycloak/bin/kc.sh build
In this stage, we use a Keycloak image to create an optimized Keycloak setup. We copy the SPI JARs from the Maven builder stage, enable health and metrics support, configure Keycloak settings, add custom themes, and run the Keycloak build.
Stage 3: Final Keycloak Image
Dockerfile
FROM quay.io/keycloak/keycloak:${KC_VERSION}
COPY --from=builder /opt/keycloak/ /opt/keycloak/
ENTRYPOINT ["/opt/keycloak/bin/kc.sh"]
The final stage uses a clean Keycloak image. We copy the optimized Keycloak setup from the builder stage, resulting in a lightweight and secure Keycloak image that includes our custom SPIs and themes.
Building the Image
To build the image run this command in you shell:
bash
docker build -t keycloak-blog .
Running the Image
After successfully building your image, you can run it with the following command:
bash
docker run -p 8080:8080 \
-e KEYCLOAK_ADMIN=admin \
-e KEYCLOAK_ADMIN_PASSWORD=admin \
-v ./volume:/opt/keycloak/properties \
keycloak-blog:latest \
start-dev
This command initiates a Docker container using the `keycloak-blog` image, linking the host's port 8080 to the container's port 8080. It configures an administrative user with both the username and password set to `admin`. The container is launched in development mode by specifying `start-dev`, making it ideal for development and testing environments. Additionally, this command mounts a volume from the host's `./volume` directory to `/opt/keycloak/properties` inside the container. This mounted volume is used to supply a properties file containing user information used by the custom SPI to the Keycloak instance.
You can access your customized Keycloak setup by navigating to http://localhost:8080 in your web browser.
Integrating the Provider into a Realm with Custom Login Theme Activation
After deploying your custom Keycloak setup, the next step involves integrating your provider and activating the custom login theme. Start by logging into the Keycloak Admin Console. Follow these steps for a comprehensive setup:
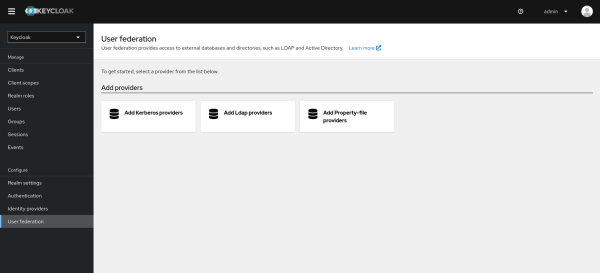
- User Federation Configuration:
Navigate to the "User Federation" section.
Here, you'll find your newly deployed providers listed under the "Add provider" section.
For the `property-file` provider, select it from the list and save the configuration.
This provider uses a pre-configured property file included within the deployment.
UserFederation
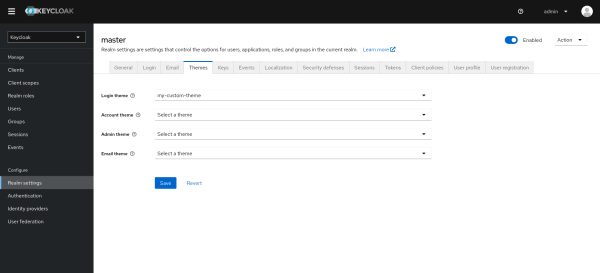
- Realm Settings:
Ensure your realm is configured to use the custom login theme.
Go to the "Realm settings" > "Themes" tab, and select your custom theme from the "Login theme" dropdown.
Save your changes.
RealmConfig
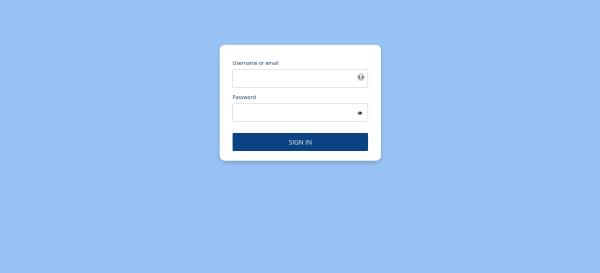
- Activating the Custom Login Theme:
With the custom theme selected, users will now see the custom login screen when accessing the account service.
This enhances the user experience by providing a branded login interface.
LoginScreen
- Testing:
You can immediately test the integration and theme activation by attempting to log into the account service using the credentials: username user and password password.
This user is preconfigured in the property file used by the property-file provider. You can also create new users and test the login process with them.
This approach not only integrates your provider into the realm but also enhances the login experience with a custom theme, making the process seamless and visually appealing.
Benefits of Multistage Builds
- Efficiency: By separating the build environment from the runtime environment, we can keep our final image size to a minimum, including only what's necessary for running Keycloak.
- Security: Reducing the number of layers and files in the final image minimizes the attack surface, making our Keycloak deployment more secure.
- Simplicity: Multistage builds allow us to streamline our Dockerfile, making it easier to read, maintain, and update.
Final Thoughts: Docker Builds Redefined
Docker multistage builds offer a flexible and efficient way to build custom Keycloak SPIs. By compiling SPIs in a separate Maven build stage and incorporating them into a Keycloak image,
we can create optimized and secure Keycloak deployments tailored to our specific needs.
This approach not only improves the efficiency and security of our Keycloak images but also simplifies the build process.
Additional Resources
For those interested in exploring the code and Dockerfile in more detail, you can find all the necessary files in our GitHub project. This includes the custom SPI implementation, the Dockerfile, and any additional resources used in this guide.
Visit our GitHub project: https://github.com/open200/keycloak-blog
Feel free to clone the repository, explore the code, and use it as a starting point for your own Keycloak SPI projects.